Customer groups
Sort your riders into groups — beginners, advanced, kids, the competition team — filter People by them, and see them under each rider's name wherever you pair riders with horses. Staff only; customers never see them.
ForAdminsInstructorsHelpers
On this page
Customer groups are your stable's own labels for its riders — Beginners, Advanced, Kids, the competition team, whatever fits how your yard works. A rider can be in any number of groups. The groups show up on the People page as a column and a filter, and under the rider's name wherever you pair riders with horses, so whoever is putting someone on a horse can see at a glance who they are.
Who sees groups, and who can change them
- Admins create, rename, recolour, reorder and archive groups, and put customers in and out of them.
- Instructors put customers in and out of groups, but can't create or change the groups themselves.
- Helpers see a rider's groups on the schedule, but can't change anything.
- Customers never see groups — not on any page they use, and not in the data export they can download from their account.
Because helpers see group names too, name groups with that in mind: a group called “Difficult customers” is visible to everyone who works at your stable. One more case to know about: someone who rides at your stable and works there (for example a helper who also takes lessons) sees their own groups, because they see what staff see.
The starting groups
Every stable starts with two groups, Beginners and Advanced, named in your stable's language. They're ordinary groups: rename, recolour or archive them like any other. Once you've changed or archived them, they don't come back.
Managing groups
On People, admins have a Manage groups button in the top-right corner. It lists your groups with how many customers are in each. The up and down arrows beside a group move it earlier or later in the order, which is the order groups appear in everywhere — this works from the keyboard too.
- Click New group, or click an existing group to edit it.
- Enter a Name (for example “Kids”) and, optionally, a Short label (up to 4 characters, shown where space is tight).
- Pick a Colour and an Icon or emoji.
- Click Save.
Two live groups can't share a name. To retire a group, open it and click Archive. The confirmation tells you how many customers are in it. An archived group disappears everywhere. Its assignments are kept, but an archived group can't be restored from the app yet.
Putting customers into groups
For one customer: open them on People and look at the Activity tab, just under their notes. The Groups section shows the groups they're in. Click Add to group to add one, or the × on a group to take them out. Admins and instructors can do this.
For many customers at once (admins): on People, click Edit in the top-right corner. The list becomes a sheet: every customer is a row and every group is a column.
- Tick a cell to put that customer in that group, untick it to take them out. Each change saves straight away.
- Drag down a column to tick or untick several customers in one stroke.
- Click the number under a group's name (or Tab to it and press Enter) to select the column, then press Space to add or remove every customer currently shown. Press Esc to clear the selection.
- Drag a column header left or right to reorder your groups (without a mouse: click Close edit view, then use the arrows in Manage groups). Click the group's chip in the header to edit it, or the + to add a new group.
- Undo and Redo step back and forward through the changes you made in this session.
Search and the Groups filter still work in the sheet, which is handy for narrowing the list before a bulk change. One change can cover at most 500 people. Click Close edit view when you're done.
Finding customers by group
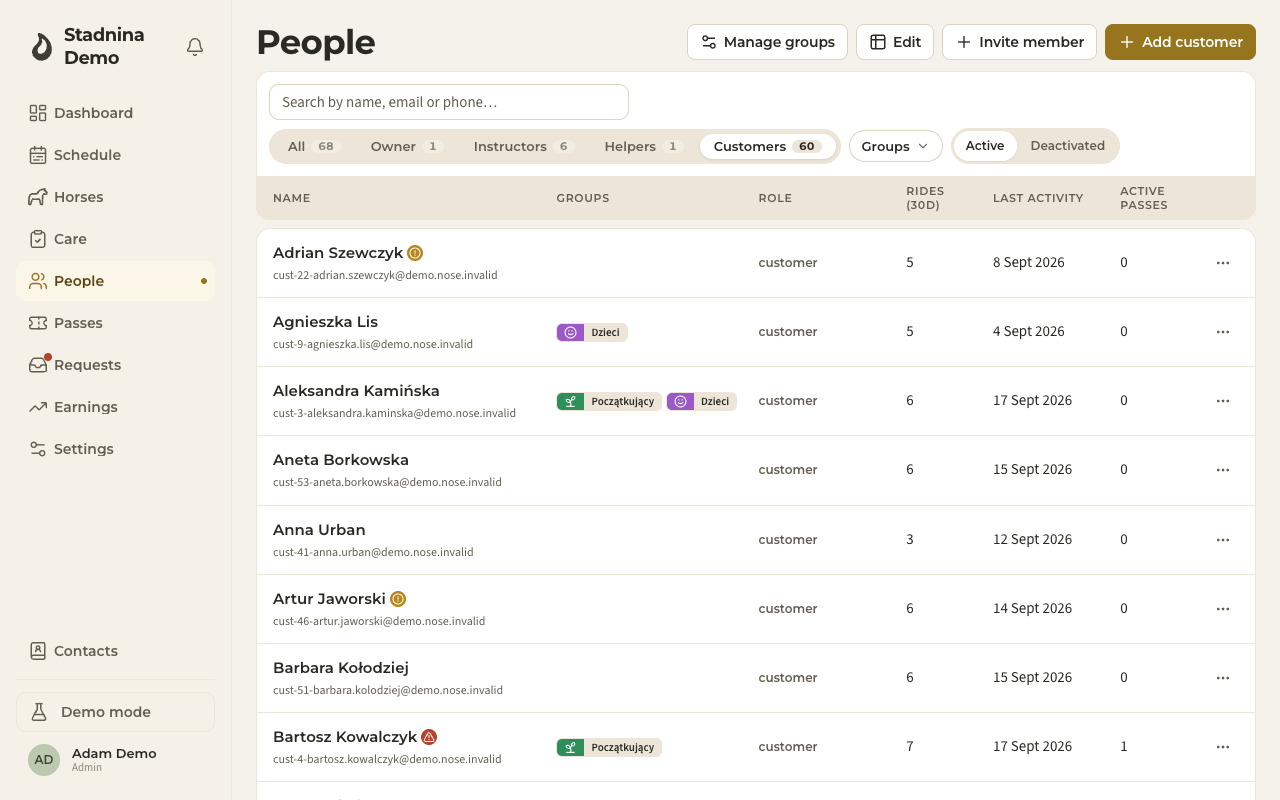
The People list has a Groups column showing each person's groups. Use the Groups filter next to the role tabs to show people in any of the groups you pick, or choose No group to find people who aren't in one yet. On a phone, the same filter is in the filter bar at the bottom of the screen.
Groups on the schedule
Wherever you're deciding who rides what, a rider's groups appear as small coloured badges under their name:
- on a ride's Allocate & Settle tab — paired riders, unpaired riders, and the search you use to add a rider;
- in the day view — on each rider in the grid, and in the list that opens when you add a rider to a cell;
- on a ride's Details tab, which helpers see.
Up to four badges show, then a +N for the rest. Hover over the badges, or click or tap them, to see every group the rider is in, with its full name. Tapping the badges only opens that list: it doesn't select, pair, drag or book the rider.
Good to know
- Groups are labels only. They don't change which rides a customer can book or which horses they're offered.
- A group's colour and icon look the same as a horse group's. The row they're on tells you which kind it is.
- If a customer is merged with a duplicate record, they keep the groups from both records. If a customer deletes their account, their group memberships are deleted with it.
- Another staff member's changes can take a few minutes to show on your screen. Reload the page to see them straight away.
Related
- People and roles — the People page, the customer panel and its tabs.
- Horse groups — the same idea for horses.
- Week and day views — the day view where group badges appear.
- Settling a ride — the Allocate & Settle tab.